
用python写一个Windows下的检测工具
词典笔有一个语音助手的功能,有时候会收到用户反馈这个功能不能用,类似于下面这样的情况
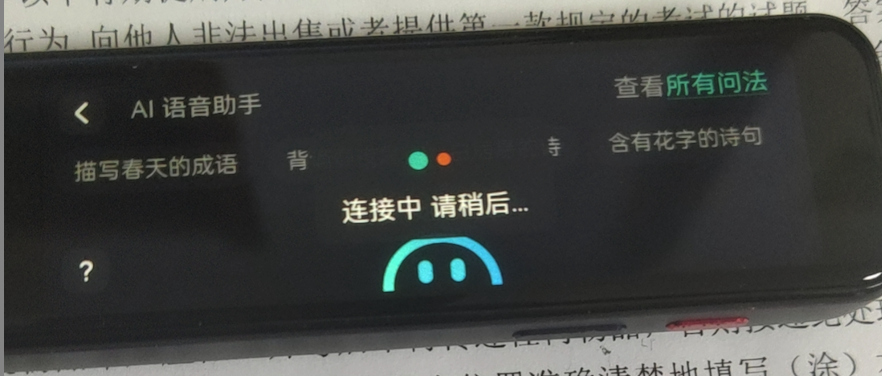
,在查看笔端上传的日志同时还会找用户配合拿一些检测信息,比如ping,方便从运维侧进行排查。
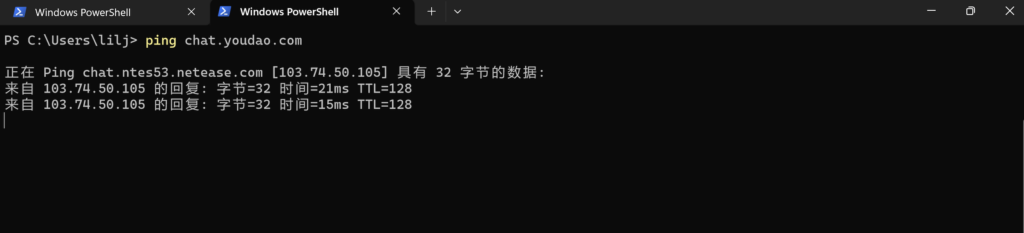
每次找用户执行的都是一些固定的操作,类似ping、telnet、访问某个url等,就在想能不能把这些操作写成一个exe可执行文件,下次再需要用户操作,直接发给用户去执行这个exe,这样方便用户操作,同时还可以收集更多的信息,方便问题的排查。
首先要先确认需要收集的信息,包括用户的来源IP、解析语音助手域名的结果、ping域名的结果、telnet域名443的结果、访问域名的各阶段时间(获取DNS、连接建立、传输时间等)统计、websocket检测。直接上代码:
def get_netinfo_youda():
    try:
        url = '有道获取ipinfo的接口'
        response = requests.get(url)
        result = response.text
        # print(result)
        return result
    except Exception as e:
        return str(e)


def get_domainip(host):
    try:
        domain = host
        ip_address = socket.gethostbyname(domain)
        result = print(f"{domain} 连接的IP地址为: {ip_address}")
        return result
    except Exception as e:
        return str(e)

# Ping函数


def ping(host):
    try:
        # ping -c的话需要管理员权限,改为-n
        command = ['ping', '-n', '4', host]
        print(f"{command}")
        result = subprocess.run(command, stdout=subprocess.PIPE)
        # output = result.stdout.decode('utf-8')
        # Windows的编码格式是gbk
        output = result.stdout.decode('gbk')
        return output
    except Exception as e:
        return str(e)

# Telnet函数


def telnet(host, port):
    try:
        print(f"telnte {host} {port}")
        tn = telnetlib.Telnet(host, port)
        tn.close()  # 关闭telnet连接
        return True
    except Exception as e:
        return str(e)

# 检测域名地址与访问链路质量


def check_domain(host):
    try:
        URL = "https://{}/hello123".format(host)

        c = pycurl.Curl()  # 创建一个Curl对象
        c.setopt(pycurl.URL, URL)  # 定义请求的URL常量
        c.setopt(pycurl.CONNECTTIMEOUT, 10)  # 定义请求的等待连接时间
        c.setopt(pycurl.TIMEOUT, 20)  # 定义请求的超时时间
        c.setopt(pycurl.NOPROGRESS, 1)  # 屏蔽下载进度条
        c.setopt(pycurl.FORBID_REUSE, 1)  # 完成交互后强制断开连接,不重用
        c.setopt(pycurl.MAXREDIRS, 1)  # 指定HTTP重定向的最大数为1
        c.setopt(pycurl.DNS_CACHE_TIMEOUT, 30)  # 设置保存DNS信息的时间为30秒
        c.setopt(c.USERAGENT, 'Foo')

        # 创建一个文件对象,以‘wb’方式打开,用来存储返回的http头部及页面内容
        indexfile = open(os.path.dirname(
            os.path.realpath(__file__))+'/content', 'wb')
        # os.path.realpath(__file__) 返回指定的文件名真实路径,不使用任何符号链接。os.path.dirname返回文件路径

        # 将返回的HTTP HEADER定向到indefile文件对象
        c.setopt(pycurl.WRITEHEADER, indexfile)
        c.setopt(pycurl.WRITEDATA, indexfile)  # 将返回的HTML内容定向到indexfile文件对象
        try:
            c.perform()  # 提交请求
        except Exception as e:
            print('connection error:' + str(e))
            indexfile.close()
            c.close()
            sys.exit()

        NAMELOOKUP_TIME = c.getinfo(c.NAMELOOKUP_TIME)  # 获取DNS解析时间
        CONNECT_TIME = c.getinfo(c.CONNECT_TIME)  # 获取连接建立的时间
        PRETRANSFER_TIME = c.getinfo(c.PRETRANSFER_TIME)  # 获取从连接建立到准备传输所消耗的时间
        STARTTRANSFER_TIME = c.getinfo(
            c.STARTTRANSFER_TIME)  # 获取从连接建立到传输开始所消耗的时间
        TOTAL_TIME = c.getinfo(c.TOTAL_TIME)  # 获取传输的总时间
        HTTP_CODE = c.getinfo(c.HTTP_CODE)  # 获取 HTTP 状态码
        SIZE_DOWNLOAD = c.getinfo(c.SIZE_DOWNLOAD)  # 获取下载数据包大小
        HEADER_SIZE = c.getinfo(c.HEADER_SIZE)  # 获取 HTTP 头部大小
        SPEED_DOWNLOAD = c.getinfo(c.SPEED_DOWNLOAD)  # 获取平均下载速度

        # 打印输出相关数据
        print('HTTP状态码: %s' % (HTTP_CODE))
        print('DNS解析状态:%.2f ms' % (NAMELOOKUP_TIME*1000))
        print('建立连接时间: %.2f ms' % (CONNECT_TIME*1000))
        print('准备传输时间:%.2f ms' % (PRETRANSFER_TIME*1000))
        print('传输开始时间:%.2f ms' % (STARTTRANSFER_TIME*1000))
        print('传输结束总时间:%.2f ms' % (TOTAL_TIME*1000))
        print('下载数据包大小:%d bytes/s' % (SIZE_DOWNLOAD))
        print('HTTP 头部大小:%d bytes/s' % (HEADER_SIZE))
        print('平均下载速度:%d bytes/s' % (SPEED_DOWNLOAD))
        # 关闭文件及curl对象
        indexfile.close()
        c.close()
    except Exception as e:
        return str(e)


# WebSocket连接测试


async def test_websocket(host):
    try:
        s = socket.socket(socket.AF_INET, socket.SOCK_STREAM)
        s.connect((host, 443))
        s.send(b'GET / HTTP/1.1\r\nHost: chat.youdao.com\r\n\r\n')
        msg = s.recv(1024)
        s.close()
        # print(msg)
        if '400 Bad Request' in str(msg):
            return "WebSocket connection successful"
    except Exception as e:
        return str(e)

# 测试函数


async def run_tests(host, port, url):
    print("\n+----------------------获取用户网络信息------------------------------+\n")
    print("network information youdao: ")
    print(get_netinfo_youda())

    print("\n+----------------------获取chat.youdao.com解析出来的IP---------------+\n")
    print("Get domain ip: ")
    print(get_domainip(host))

    print("+------------------------对chat.youdao.com进行ping测试----------------+\n")
    print("Ping Test:")
    print(ping(host))

    print("\n+----------------------对获取的IP进行telent测试----------------------+\n")
    print("Telnet Test:")
    print(telnet(host, port))

    print("\n+----------------------对chat.youdao.com进行访问测试-----------------+\n")
    print("Domain Check Test:")
    print(check_domain(host))

    print("\n+----------------------对chat.youdao.com进行websocket访问测试-------+\n")
    websocket_result = await test_websocket(host)
    print("WebSocket Test:")
    print(websocket_result)


# 主函数


def main():
    host = "chat.youdao.com"  # 替换为您要测试的域名或IP地址
    port = 443  # 替换为您要测试的端口号
    url = "wss://chat.youdao.com"  # 替换为您要测试的WebSocket URL、
    with open('output.txt', 'w') as data:
        sys.stdout = data
        asyncio.run(run_tests(host, port, url))
        data.close()


# 运行主函数
if __name__ == "__main__":
    main()
PyCURL是一个Python接口,它是多协议文件传输库的LIbCURL。本代码pycurl部分引用峰哥的代码,地址:https://www.cnblogs.com/FengGeBlog/p/14178563.html
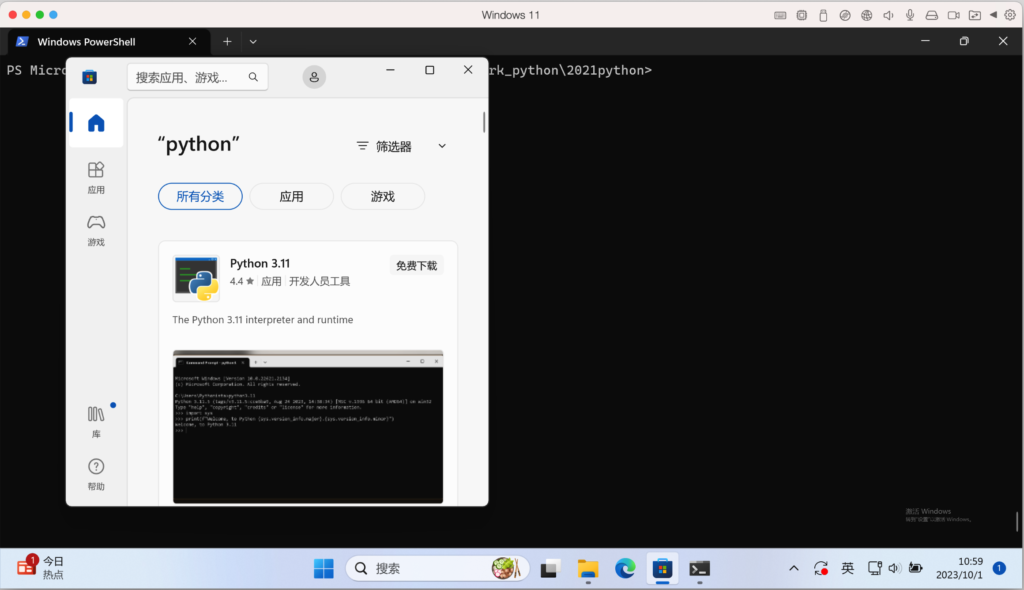
第二步部署打包环境,把Python文件打包为一个可执行的exe文件,使用pyinstaller就可以。在Windows11环境下安装Python环境,使用搜索来安装python3.11和python3.8,后面会说一下原因。
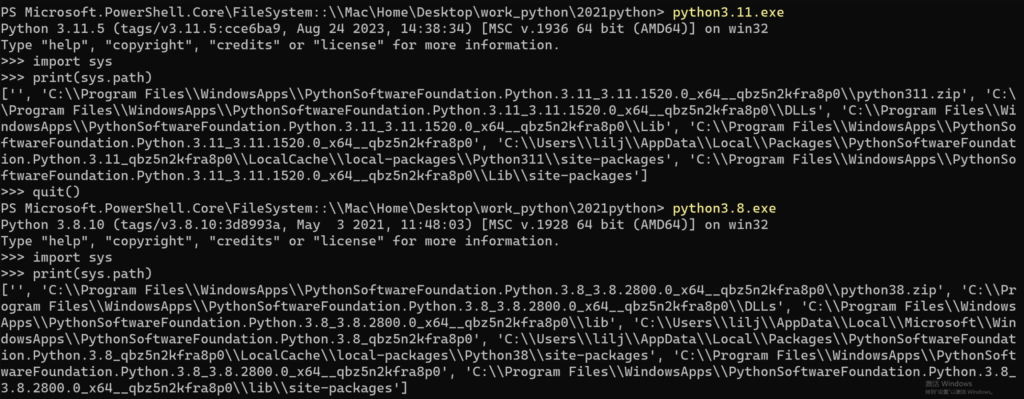
安装pycurl麻烦一些,可以参考https://blog.csdn.net/lingdu03/article/details/95044659 这位博主的文章编译Python代码生成exe文件,用sys.path获取安装的Python的路径,如下所示,使用pyinstaller进行打包,详见代码。
#打包命令
#-i 可以指定一下icon图标,下载地址:http://www.icosky.com/icon/icons-2-icon/
#--hidden-import requests 把requests模块打包进去,不然执行的时候会提示找不到模块
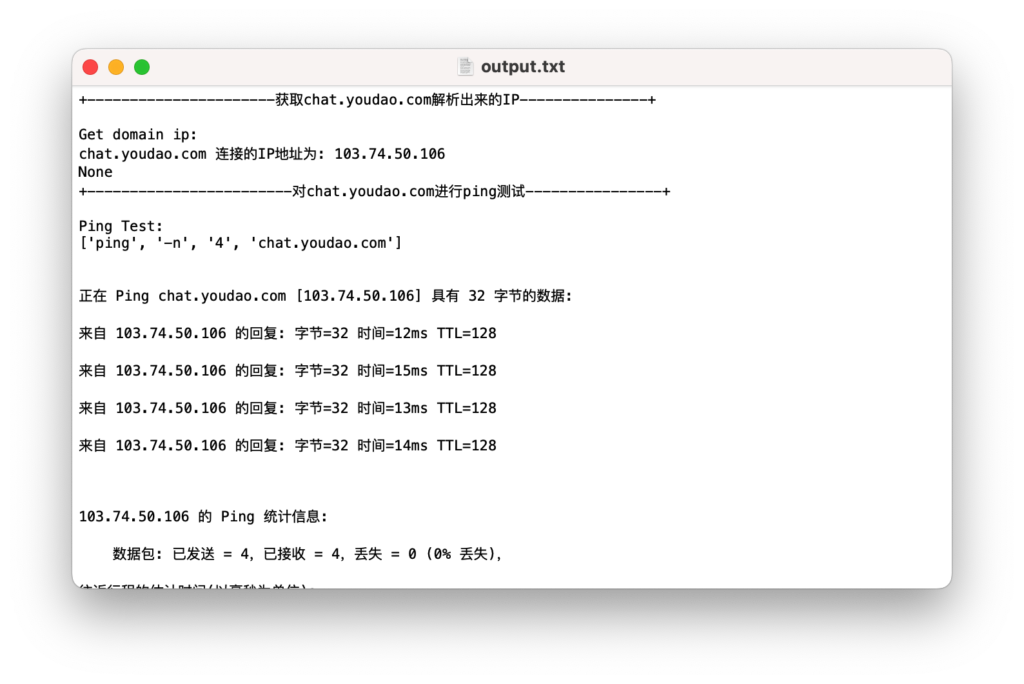
C:\Users\lilj\AppData\Local\Packages\PythonSoftwareFoundation.Python.3.11_qbz5n2kfra8p0\LocalCache\local-packages\Python311\Scripts\pyinstaller.exe -F -w -i advancedsettings.ico check_run.py --hidden-import requests - 在Windows11 编译成功后会在当前目录下生成一个dist\check_run.exe可执行文件,在Window11系统运行生成output.txt文件,内容如下:
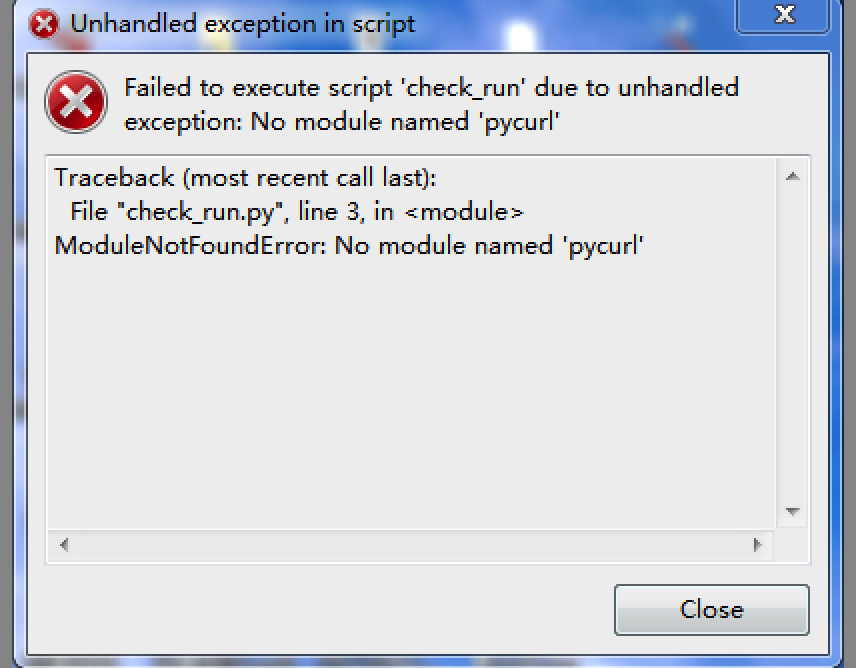
- Window7运行提示,这个原因就是Python3.9之后的版本无法支持Window7导致的,所以要单独装一个Python3.8去编译

- Window7执行Python3.8编译的exe后提示这个,需要在编译中添加–hidden-import pycurl参数来解决
到此就完成了用python写一个Windows下的检测工具,在Window7 和 Window11下都可以运行。